Showing posts with label IOT. Show all posts

26 Jan 2016

Android as an IOT platform

The term “platform” is very ambiguous when used carelessly by programmers and consultants in the information technology business. Under various circumstances, TCP/IP, Linux, Oracle and Java are all referred to as platforms even though they are neither similar nor comparable to each other. Even within the narrower definition of IOT we can look at platforms from at least three directions. First,  we have hardware based platforms like Qualcomm’s AllJoyn, Intel’s IOTivity, Apple’s Homekit  and Android/Brillo from Google. Second, we have different data transport protocols like XMPP - used in Internet Messaging (IM), MQTT - a publish / subscribe model for messages, DDS - another pub/sub model for data distribution services and AMQP - Advanced Message Queuing Protocol. Finally we have integrated, cloud based platforms from big and small companies like IBM Bluemix, Carriots, n.io, thethings.io, thingworx and many others that claim to provide end-to-end solutions to transfer information from one machine to another.


All this is very confusing for any programmer who has built traditional, multi-tier applications that have a human user in the front and an RDBMS at the back. How does he get into the exciting world of IOT? What are the components that he needs to understand and work with?


Let’s break up the problem into four components. First we need a sensor A that will detect a physical property like temperature, air-pollution or blood sugar and generate a digital signal. Second we need a mechanism B that supports data transfer. Third we need a device C, a processor with an OS, that supports a device driver for A and programming language that can interface with B. Finally, we need a program D to receive the data and store it in a persistent database. It is now our job to identify the components A, B, C and D.


A, the sensor, would be very domain specific and would have to be sourced from specialist hardware vendors. Many kinds of sensors are readily available along with their device drivers for Linux, Windows and Android.


An important requirement of component C is that it should be small, portable, have a low power consumption and yet provide continuous data connectivity. While dedicated devices can always be built to meet these requirements, IOT enthusiasts often begin with Arduino or Raspberry Pi. But an inexpensive Android device is perhaps a better option because not only does it meet these basic requirements but also supports a wide range of sensors natively. Moreover, given the frenzy around Android development, there are many tutorials available and android tagged questions in stackoverflow are answered quickly! So for the choice of C, Android is a good option.


Moving on to B, the data transport mechanism, the two simplest options are XMPP and MQTT. Both are available as open source implementations and work comfortably on the IP networks that an Android device routinely connects to using either WiFi or 3G/4G data service. XMPP, formerly known as Jabber, is the basis of all Internet Messaging or “chat” services, like Google Chat, and there are free servers and services available for building and testing applications. XMPP also offers the security of a login and a password along with the concept of authorised “friends” or “contacts”, but this can become a challenge if we have to allocate and manage IDs for each and every machine in the IOT network. MQTT, formerly known as IBM MQ Series until it was made open source, offers a convenient publish / subscribe model where any device can publish messages under a topic into a central server, like Mosquitto or HiveMQ, and which can be retrieved by any other device that subscribes to the same topic on the same server. Both XMPP and MQTT have Java and Python libraries that allow applications developed in either of these languages to transmit and receive data as text strings. These libraries are available not only for Windows and Linux platforms but so can be used for in Android apps.


With these libraries it is now entirely possible to write applications on component C that will transmit data. Corresponding applications on component D, which could be a standard Linux server running Python, Java and either SQLite or MySQL, would receive the data, decode and process it with business logic and store it in a persistent database for subsequent analysis and display.


iot7939a.png


If we leave aside the integrated, proprietary, cloud-based platforms then the Android platform with applications developed with either XMPP or MQTT libraries is a very viable option. Why do we say so? First Android devices are dirt cheap and available at retailers like Walmart for US$10. Remove the unnecessary audio and video components and wholesale prices will drop to half of that. Second the gigantic and ever expanding community of Android app developers represents a huge pool of talent and expertise that can be leveraged inexpensively. Third, Android already has native support for all popular data transfer mechanisms like 3G / 4G / WiFi / Bluetooth / NFC and is likely to support anything else that comes in the future. Fourth, Android devices routinely support many kinds of sensors for gathering biometric, motion, position and environmental data and thanks to the pressure from app builders there are many third party sensors in the market for biomedical and additional environmental data all of which are very useful for IOT applications.

But the fifth and most important reason to bet on an Android based IOT is the massive ecosystem around it. Google has not only invested US$ 3.5 billion in acquiring the home automation company Nest but has also thrown its weight behind a brand new product, Brillo, that is based on Android and extends it with Weave, a data communication platform for IOT. Of course, not all Google products are equally successful -- Google+ or Google Wave are nowhere as popular as its search engine, Gmail or Youtube -- but with an 80+% market share Android is miles ahead of the competition in the 2+ billion smartphones that are in the market today.

This article was originally published in theStack

24 Nov 2015

IOT : Sensing & Controlling an Android Device through MQTT Messages

In two earlier posts, we had explored how to create (a) LightWatch - an IOT proof-of-concept  for an ambient light sensor based on Android and the XMPP chat protocol and (b) LightWatchMQ - which would essentially do the same thing but use the more popular MQTT protocol. In each case we were essentially trying to simulate an IOT system based on the Android platform that will use native (or external ) sensors attached to the Android device to communicate with a central "controller" machine. This machine could be a simple Android device with the XMPP or MQTT client or could be running a Python program that listens for messages, extracts data and stores the same in a SQL database.

In this application, we, in a sense close the loop! Not only does the Android device transmit data from its sensors but in term it can be controlled to perform a physical activity -- sound a bell or flash its LED light when "instructed" to do so by the central machine.


The sequence of events is as follows :
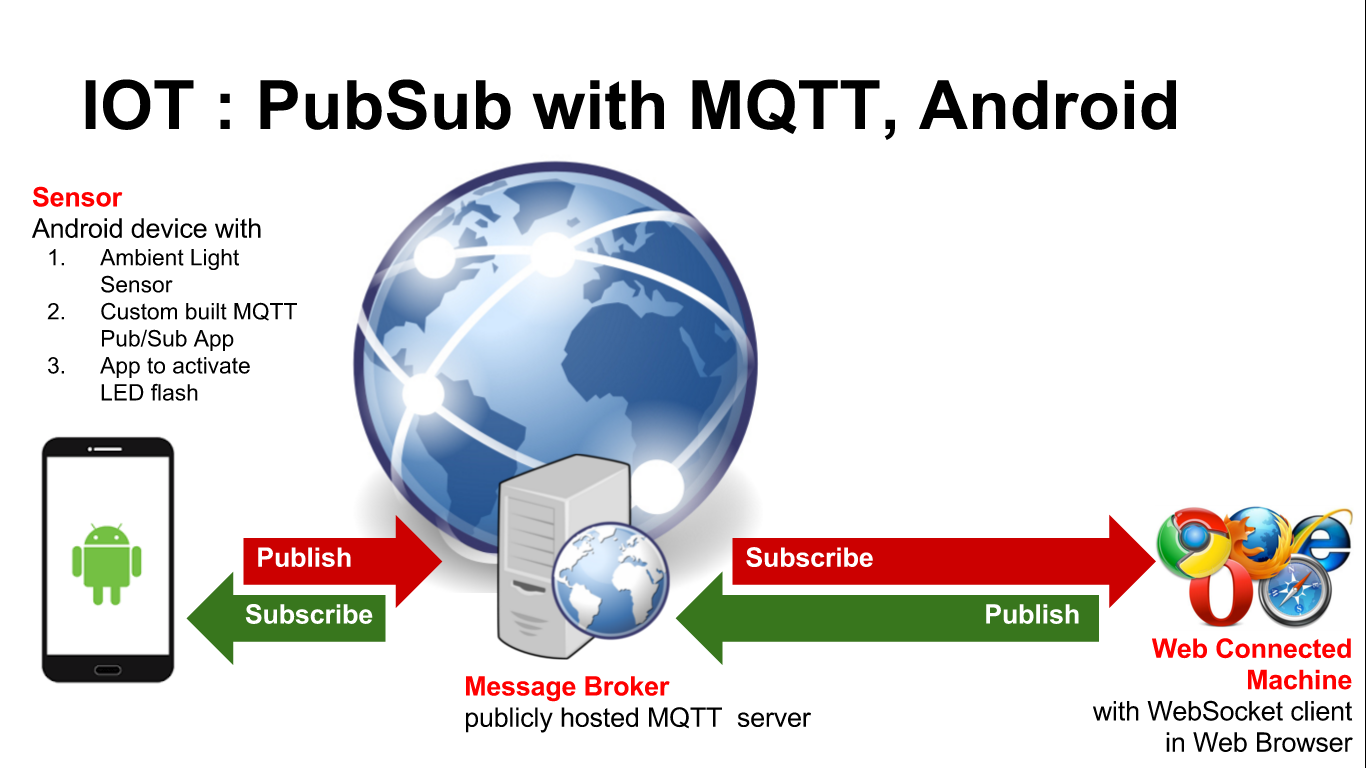
  1. A custom built app IOT7939 is started on the remote Android device. This measures the ambient light near the device and publishes two messages on the IOT79 topic of a publicly hosted MQTT webserver, eg http:/broker.hivemq.com:1883 or http://test.mosquitto.org:1883
  2. A central MQTT client subscribes to this topic, IOT79, using, for example a websockets client available at http://www.hivemq.com/demos/websocket-client/ or http://test.mosquitto.org/ws.html Both these clients can Publish or Subscribe to their respective brokers. However any third party MQTT client can also be used. Hence data from the Android machine is received here.
  3. If the central MQTT client wants to initiate an activity on the Android device, it publishes a message on the IOT39 topic. The remote Android machine has subscribed to this topic and listens for a message. When the message arrives, three things happen : 
    1. Another publishing activity is triggered on the Android App, as a kind of acknowledgment for the message received and also to transfer fresh sensor data.
    2. A bell mp3 file is played. If the message contains the world "siren" a different alarm mp3 file is played.
    3. The LED flash on the Android is activated for 5 seconds.
While the Publish and Subscribe activities are reasonable easy to build into the app, the flashing light constitutes a challenge. While there are many webposts that explain how to operate the flash on an Android device and even give the sample code,  almost all of them are based on the deprecated camera class of Android and samples with the new camera2 class are not easily available. What this means is that code that runs on one machine may not run on another. For example, the Flashlight code that was used in this application runs happily on my Motorola with Android 5.1 but did not run on my Micromax with Android 6!

Rather than breaking our head on this, what we did was to de-couple the LED-flashing code from the general MQTT Pub/Sub code and created two apps. The LED Flashlight app is a very simple app that "OnStart" switches on the LED, waits for 5 second, switches the LED off and then exits. This app can easily be replaced with any more rugged Flashlight app that has an inbuilt feature to turn-on itself during the start. This LED flashlight app can be called from the main App with a few lines of code, provided we know the package and the activity name.

    String ExternalAppPackage = "org.iothub.flashlight";
    String ExternalAppActivity = "org.iothub.flashlight.MainActivity";
 
    Intent intent = new Intent(Intent.ACTION_MAIN);
    intent.setComponent(new ComponentName(ExternalAppPackage,ExternalAppActivity));
    intent.addFlags(Intent.FLAG_ACTIVITY_NEW_TASK);
    startActivity(intent);


Another very interesting feature of this app is that each device on which this app is run, automatically gets its own id derived from the Android ID . This is Published. So messages Published by the central server can contain this Android ID and the app can be modified to parse subscribed message so that each machine ONLY responds to messages that contains its own Android ID. So in effect, the broadcast can be converted into a narrow-cast and target only specific machines.


This screen-shot shows the WebSockets client on the central machine that receives message on IOT79 topic and these messages contain the Android ID as the first field. Also note that when it Publishes on the IOT39 topic, the message is trapped on the Android app and published "back". Since the message can be trapped, it can be parsed and acted upon "intelligently" with a simple if-then-else construct.

In fact, any third party MQTT client can be used to subscribe to and publish messages on the IOT79, IOT39 topics as shown in this screen capture here


The entire code for the main MQTT Pub/Sub app IOT7939 and the auxiliary Flashlight app is available in GitHub code repository.

Android is one of the most widely used platforms in the world and it is very likely that The Smartphone and the Internet of Things will get very closely tied to each in the future. Hence it makes sense to learn and explore how the key features of IOT can be implemented with Android. This was the motivation for building this proof-of-concept. 

19 Nov 2015

LightWatchMQ : IOT with MQTT / PubSub and Android

The LightWatch application described in the previous post demonstrated a full cycle IOT application with an Android client picking up data from the built-in Android light sensor and then sending the data to a remote machine using an XMPP chat server as a message broker. However the Publish / Subscribe ( PubSub ) model of the MQTT message broker offers a potentially simpler and "cleaner" way of doing the same. One big advantage of the PubSub model is that that there is no need to create userid/passwords for each Android device that is being used as sensor / transmitter. This can become a bottleneck if the number of deployments is very large. 

Getting Started with MQTT on Android

There is no immediate need to download, install or otherwise implement an MQTT server. The easiest way is to use the free HiveMQ server available for testing applications. We also assume that you have a Linux based Android application development environment with Eclipse and the Android SDK already installed. If not, please read through this blog post on Android Programming with Eclipse.

To get started on the Android end, first clone this Git repository into your machine and then follow these instructions. If you are not familiar with Maven, take a deep breath and then go through this tutorial. Basically, you need to successfully execute just two steps, mvn clean install  for the two directories org.eclipse.paho.android.service and org.eclipse.paho.client.mqttv3 to create two critical jar files :  org.eclipse.paho.android.service-1.0.2.jar and org.eclipse.paho.client.mqttv3-1.0.2.jar. Then import the  org.eclipse.paho.android.service.sample application into Eclipse, drop in the two jar files into the lib and you should have a working MQTT client for Android that  will demonstrate all aspects of MQTT technology.

Building your own application

The sample application built in the previous step is full service MQTT client with lots of smart features but modifying it to meet the requirements of our IOT system is very complicated. A simpler sample is available at git dobermai / android-mqtt-push  where the Thermometer.java is a very useful sample to model our application on.

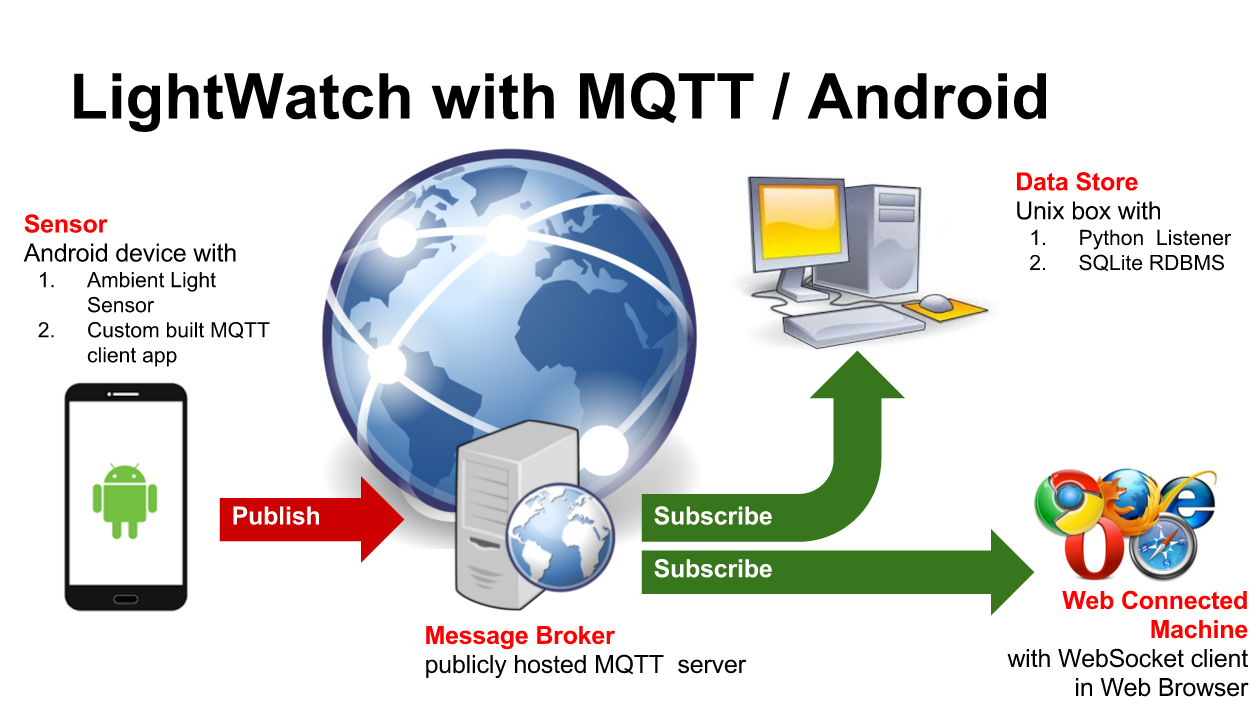
The LightWatchMQ application is basically a port of the original LightWatch2 application with the XMPP calls being replaced with corresponding MQTT calls. The current prototype also demonstrates all the essential components of an IOT system, namely
  • A physical sensor : In this case, the light sensor built into an Android device that measures the lux intensity of ambient light.
  • A "publish" function implemented with an Android App
  • A central message broking service : In this case the HiveMQ server that supports the MQTT pub/sub protocol.
  • Two "subscription" options : implemented through (a) WebSocket Client and (b) a Python listener program that reads data and pushes it into a SQLite database for future processing.

The entire code of the application, including the MQTT jars is available in the GitHub repository LightWatchMQ, as an Eclipse project export and can be downloaded and imported directly into the Eclipse workspace. If the Android SDK has been set up properly, it should compile and execute on any Android machine higher than 4.4.

In addition to the replacement of the XMPP calls with MQTT calls, there are few differences from the original LightWatch2 application and these are as follows :
  • Since there is no userid/password in the PubSub model of MQTT, we are using the Android_ID of the Android device to identify the source of data. This is being published into the broker and is available to the subscriber applications.
  • The two buttons for Start, Stop have been replaced by one single button that changes cleverly changes functionality and behave either as Start or as a Stop button depending on whether the Service is Stopped or already Running. This clever piece of code taken from  dobermai / android-mqtt-push.
  • There is an upper limit on the number of times data can be published by the app. This is more of a debugging feature designed to prevent run-away loops during the development process. In reality, this can be set to a very high number or deleted completely.

Testing the application

The application is designed to connect to the free MQTT broker available at http://broker.hivemq.com:1883 and publish on the topic iothub.


Once the app is loaded, the Publish activity can be started by pressing the Start Service button. To see the output, we login at HiveMQ websocket client and subscribe to the topic : iothub with Quality of Service set to 0 and see the data coming in :


On would notice that when the Android sensor device was covered with a piece of cloth, the lux value dropped from 74 to 13 and when the cloth was removed, the lux value went back to where it was. The Android_ID of the device is also being reported as the long alphanumeric string separated from the lux value with a semicolon.

The data can also be checked with a listener program written in Python, taken from the Paho sample library and then modified to store the data in a SQLite database.


Here again we see the Lux values reported by the client and we see that the intensity reported goes down ( to 2) when the device is covered by hand.

This test was carried out with the Android device [ A Motorola phone ] connected to the WiFi, but it has also been tested with Micromax phones and tablets working with a simple 2G data network. It works!

What have we achieved ?

We have shown how to build a simple Android app that can integrate an Android device into an IOT system. We demonstrate the use of the Light Sensor, but other sensors available on Android can be used as well, to measure the intensity of ambient light and "publish" the information into an MQTT broker. This information can be downloaded by any "subscriber" and displayed on a screen, stored in a database or processed further.

MQTT is one of the most popular protocols used in the IOT environment and Android devices with sensors are widely available. Using this combination helps us to get started with simple IOT projects without too much trouble.

30 Oct 2015

Lightwatch : An IOT prototype using XMPP and Android

In two earlier posts, we have shown how to build (a) an XMPP chat client in Python that can listen for incoming messages and, where applicable, store the data in an SQLite database and (b) a XMPP chat client for Android that can transmit data from an Android device. With these two components we are now in a position to build a realistic prototype of an IOT system that will continuously transmit information about ambient light conditions from an Android device.

This prototype will demonstrate all the essential components of an IOT system namely
  • A  physical sensor - in this the light sensor built into an Android device that measures the lux intensity of ambient light
  • A central message broking service -- in this case an Ignite Openfire server that runs an XMPP protocol based messaging service. This is commonly known as an Instant Messaging or Chat server. XMPP is one of the standard protocols used in IOT.
  • A way to securely pass information across multiple devices. Security is established through the userid and password of the logged in users
  • A SQL compliant RDBMS that receives the light intensity data and stores it for future processing.
[ What is IOT ? Ooops ... sorry, please check out this or this :-) to understand why we are doing any of this ! ]

The overall architecture is as follows :


Any Android device has a set of physical sensors, that can be accessed from a program and these can be identified through any standard utility app, like Sensor Box. In this example, we build a sensor app that accesses the light sensor, one of the most widely available sensors, to determine the level of ambient light near the device.

The sensor app opens an XMPP chat dialogue with a controller device, which is any device that supports a generic XMPP chat client, and waits for a signal to transmit data. Once this signal is received, the sensor app opens a second XMPP chat dialogue with the Python listener and keeps sending ambient light data every 5 seconds, in the format that the listener will accept and store in the SQLite database. This continues until the controller device sends a hold signal, when the data transmission is paused. The transmission can be resumed or paused as and when required. Finally, when the controller sends a quit message, the sensor app shuts down.

To build this app, we broadly follow the instructions given in the earlier post on how to build an XMPP chat client for Android. In addition, the code to handle the light sensor is adapted from this page. In this case, the application is called LightWatch and the key files that need to be changed / modified are as follows 
  1. src/org/iothub/lightwatch/LightWatch.java
  2. res/layout/activity_light_watch.xml
  3. res/values/strings.xml
  4. res/drawable/iothub0.9.png
  5. AndroidManifest.xml
All these files are available in GitHub

To test out the application we need three Internet connected devices
  1. A Unix machine running the ChatIOT.py application as described in this post. This needs to be started with a XMPP userid / password [ referred to as the ReporterID in the LightWatch.java file]
  2. A controller device (Android, Unix, Windows whatever ) that has a chat client that is logged in with another XMPP userid / password [ referred to as the Controller ID]
  3. An Android device where the LightWatch application is installed. This application needs a third userid / password.
All three userids should be in the same XMPP server, which in our case is adastra.re and should be defined as each others chat "contacts". Otherwise messages will never be delivered or accepted.

If everything works well, the sensor app will send a message to the controller device announcing its presence. From the controller device, the message "xmit" needs to be sent back. This will initiate the transmission of a set of messages like "PUSH <lux value>" to the data store. The data store should accept these and store them in the SQLite database. If you cover the Android device with the LightWatch app with a piece of paper, you will notice a sharp fall in the lux value that is being transmitted. This was the humble goal of this application.

Everything has been tested on a Motorola phone and an Xioami tablet and it all works. 


One problem that happens is when the LightWatch gets paused, the flow of data stops! To overcome this, the app was redesigned with the bulk of the activity migrated into an Android Service. This is the LightWatch2 application that can be built with the following files -- that are available in Github. [ Actually, the entire project itself can be downloaded from here.]
  1. src/org/iothub/lightwatch/LightWatch2.java
  2. src/org/iothub/lightwatch/LightWatchService.java
  3. res/layout/activity_light_watch2.xml
  4. res/values/strings.xml
  5. res/drawable/iothub0.9.png
  6. AndroidManifest.xml
  7. res/drawable/pmbutton.xml
Both the applications work very similarly except that in the case of LightWatch2, the service has to started and stopped by pressing buttons on the main screen. After that the behaviour is similar to the LightWatch.

Building a trivial app for Android is easy but one that involves using XMPP libraries and accessing sensor data is a little more complicated. The initial effort required in setting up the process is significant, but once this done, the rest follows relatively smoothly. If you want to set up a small IOT system that is described here, follow the sequence of posts given in this blog.

  1. Build the python chat listener - chatiot.py
  2. Set up your Eclipse environment for Android
  3. Build a basic XMPP client app for Android
  4. Then do what is explained in this blog!
Where can this technology be used ?

One obvious application is in smart cities, where we can measure parameters like air pollution on a continuous basis using tools like Aircast as explained in this blog post.

17 Oct 2015

DIY IOT - XMPP Chat client for Android

In an earlier blog post we had explained how a public XMPP chat server can be used to transmit messages between two computers. In that post we had shown how we can build a chatbot listener in Python that waits for messages and when messages arrive, there was a some simple logic that allowed it to either ring an alarm ( sound a bell tone) or insert the data into an SQLite database.

This chatbot -- ChatIOT -- was tested  by sending messages from a Xabber, a free XMPP chat client using two userids registered on a free, public XMPP server available at adastra.re. This post shows how to build a basic XMPP client for Android, from scratch, using Java and the Smack XMPP library from the Openfire opensource project.

Non-trivial Android app development is not for the faint hearted. If one has never developed an Android application in the past, it would be good idea to look through this post Building an Android App -- Getting Started.

Start Eclipse and create a new Android project with the following parameters :

Use the default options on the next couple of screens and then choose the template for Blank Activity


Click through the rest of screens until the project is created and is visible on the Package Explorer panel on the left of the Eclipse Screen.

Two files would have been opened in the Editor panel, but if not, open the file ChatIOT > res > layout > activity_main.xml Replace the contents of the file with the following code :
activity_main.xml

<RelativeLayout xmlns:android="http://schemas.android.com/apk/res/android"
   xmlns:tools="http://schemas.android.com/tools" android:layout_width="match_parent"
   android:layout_height="match_parent" android:paddingLeft="@dimen/activity_horizontal_margin"
   android:paddingRight="@dimen/activity_horizontal_margin"
   android:paddingTop="@dimen/activity_vertical_margin"
   android:paddingBottom="@dimen/activity_vertical_margin" tools:context=".MainActivity">
   
   <TextView
      android:id="@+id/textView1"
      android:layout_width="wrap_content"
      android:layout_height="wrap_content"
      android:text="@string/Heading1text"
      android:layout_alignParentTop="true"
      android:textColor="#104E8B"
      android:layout_centerHorizontal="true"
      android:textSize="30dp" />
   
   <ImageButton
        android:id="@+id/imageButton"
        android:layout_width="wrap_content"
        android:layout_height="wrap_content"
        android:layout_below="@+id/textView1"
        android:layout_marginTop="15dp"
        android:layout_marginBottom="30dp"
        android:layout_centerHorizontal="true"
        android:src="@drawable/iotlogo_v1" />
   
   <Button
        android:id="@+id/button1"
        android:layout_width="120dp"
        android:layout_height="wrap_content"
        android:layout_below="@+id/imageButton"
        android:onClick="startCon"
        android:layout_marginBottom="10dp"
        android:layout_centerHorizontal="true"
        android:background="@drawable/pmbutton"
        android:text="@string/button1text" />
   
    <Button
        android:id="@+id/button2"
        android:layout_width="120dp"
        android:layout_height="wrap_content"
        android:layout_below="@+id/button1"
        android:layout_marginBottom="10dp"
        android:layout_centerHorizontal="true"
        android:onClick="pushData"
        android:background="@drawable/pmbutton"
        android:text="@string/button2text" />
    
    <Button
        android:id="@+id/button3"
        android:layout_width="120dp"
        android:layout_height="wrap_content"
        android:layout_below="@+id/button2"
        android:layout_marginBottom="10dp"
        android:layout_centerHorizontal="true"
        android:onClick="stopCon"
        android:background="@drawable/pmbutton"
        android:text="@string/button3text" />
    
    <TextView
         android:id="@+id/textView2"
         android:layout_width="wrap_content"
         android:layout_height="wrap_content"
         android:text="@string/Heading2text"
         android:textColor="#104E8B"
         android:textSize="20dp"
         android:layout_below="@+id/button3"
         android:layout_centerHorizontal="true"
         android:layout_marginBottom="40dp" />

</RelativeLayout>


This will show many errors because many of the required resources, artifacts are still missing.

Next, open the file ChatIOT > res > values > strings.xml and replace the contents with this code
strings.xml

<?xml version="1.0" encoding="utf-8"?>
<resources>

    <string name="app_name">ChatIOT</string>
    <string name="action_settings">Settings</string>
    <string name="button1text">Connect</string>
    <string name="button2text">Send</string>
    <string name="button3text">Disconnect</string>
    <string name="Heading2text">xmpp chat for IOT</string>
    <string name="Heading1text">chatIOT</string>

</resources>


Create a new folder in ChatIOT > res and name it drawable. Inside this folder, create new, empty file called ChatIOT > res > drawable > pmbutton.xml. Replace the default contents of the file with the following code :

pmbutton.xml

<?xml version="1.0" encoding="utf-8"?>
<selector xmlns:android="http://schemas.android.com/apk/res/android" >
 <item android:state_pressed="true" >
     <shape android:shape="rectangle"  >
         <corners android:radius="3dip" />
         <stroke android:width="1dip" android:color="#5e7974" />
         <gradient android:angle="-90" android:startColor="#345953" android:endColor="#689a92"  />            
     </shape>
 </item>
<item android:state_focused="true">
     <shape android:shape="rectangle"  >
         <corners android:radius="3dip" />
         <stroke android:width="1dip" android:color="#5e7974" />
         <solid android:color="#58857e"/>       
     </shape>
 </item>  
<item >
    <shape android:shape="rectangle"  >
         <corners android:radius="3dip" />
         <stroke android:width="1dip" android:color="#5e7974" />
         <gradient android:angle="-90" android:startColor="#8dbab3" android:endColor="#58857e" />            
     </shape>
 </item>
</selector>


Finally download this 9.png image file
and store it in the folder ChatIOT > res > drawable-hdpi with the name iotlogo_v1.9.png Make sure that all files have been saved, then right click on project ChatIOT and press Refresh. After this the layout should be free of errors, though there will be some warnings.  The screen will now look like this :


Open the MainActivity.java file located in ChatIOT > src > com.yantrajaal.chatiot > MainActivity.java and replace the contents of file with the following code :

MainActivity.java

package com.yantrajaal.chatiot;

import java.io.IOException;

import android.app.Activity;
import android.os.AsyncTask;
import android.os.Bundle;

import android.util.Log;
import android.view.View;
import android.widget.Toast;
// Smack libraries 
import org.jivesoftware.smack.SmackConfiguration;
import org.jivesoftware.smack.SmackException.NotConnectedException;
import org.jivesoftware.smack.chat.ChatManager;
import org.jivesoftware.smack.chat.Chat;
import org.jivesoftware.smack.chat.ChatMessageListener;
import org.jivesoftware.smack.AbstractXMPPConnection;
import org.jivesoftware.smack.SmackException;
import org.jivesoftware.smack.XMPPException;
import org.jivesoftware.smack.packet.Message;
import org.jivesoftware.smack.tcp.XMPPTCPConnection;
import org.jivesoftware.smack.tcp.XMPPTCPConnectionConfiguration;

import java.util.Random; // required for Random Number Generation

public class MainActivity extends Activity {
 String msg = "PM1139 : ";
 
 XMPPTCPConnectionConfiguration configChatIOT = XMPPTCPConnectionConfiguration.builder()
            .setUsernameAndPassword("uid2", "password2")
            .setServiceName("adastra.re")
            .setHost("adastra.re")
            .setPort(5222)
            .setResource("chatIOT")
            .build();
    
    AbstractXMPPConnection conxChatIOT = new XMPPTCPConnection(configChatIOT);
 /** Called when the activity is first created. **/
 
 @Override
    public void onCreate(Bundle savedInstanceState) {
       super.onCreate(savedInstanceState);
       setContentView(R.layout.activity_main);
       SmackConfiguration.setDefaultPacketReplyTimeout(10000);
       Log.d(msg, "The onCreate() event");
    }

 private class pmConnect extends AsyncTask<Void, Void, Void> {
      protected Void doInBackground(Void...dummy) {
       
       try {
        conxChatIOT.connect();
        conxChatIOT.login();
    } catch (SmackException | IOException | XMPPException e) {
     // TODO Auto-generated catch block
     e.printStackTrace();
    } 
         return null;
      }
/*
// this piece of code is kept just for the sake of completeness of Async Tasks
      protected void onProgressUpdate(Void...progress) {
         // setProgressPercent(progress[0]);
      }

      protected void onPostExecute(Void...result) {
          //showDialog("Downloaded  bytes");
      }
*/
  }
 private class pmSend extends AsyncTask<Void, Void, Void> {
      protected Void doInBackground(Void...dummy) {
       Random randomGenerator = new Random();
       int pseudoSensorData;
        
   // Assume we've created an XMPPConnection name "conxChatIOT"._
    ChatManager chatmanager = ChatManager.getInstanceFor(conxChatIOT);
    
    Chat ChatIOT = chatmanager.createChat("uid3@adastra.re", new ChatMessageListener() {
     public void processMessage(Chat chat, Message message) {
      System.out.println("Received message: " + message);
     }
    });
    
    for(int i=0 ; i < 4 ; i++)
    {
        
     try {
      if (i==0){
       ChatIOT.sendMessage("Sound 2");
      } else {
      // this data needs to be generated from some Android physical sensor
       // instead of using a random number generator
       pseudoSensorData = randomGenerator.nextInt(100);
       String payLoad = "Push " + String.valueOf(pseudoSensorData);
      ChatIOT.sendMessage(payLoad);
      }
    } catch (NotConnectedException e1) {
     // TODO Auto-generated catch block
     e1.printStackTrace();
    }
     try {
         Thread.sleep(5000);                 //1000 milliseconds is one second.
     } catch(InterruptedException ex) {
         Thread.currentThread().interrupt();
     }
    }
         return null;
      }

  }
 
    //Method to start the Connection
    public void startCon(View view) {
     Toast.makeText(this, "Connecting", Toast.LENGTH_LONG).show();
     new pmConnect ().execute();
    }
    
  //Method to start the Connection
    public void pushData(View view) {
     Toast.makeText(this, "Push Data", Toast.LENGTH_LONG).show();
     new pmSend ().execute();
    }
    
  //Method to Quit 
    public void stopCon(View View) {
     Toast.makeText(this, "Disconnection", Toast.LENGTH_LONG).show();
     conxChatIOT.disconnect(); 
    }
  
}


This will immediately, throw lots and lots of errors because the Smack/XMPP libraries have not been loaded as yet. To get the libraries perform the following steps 

1. Go to the Smack 4.1 Readme and Upgrade Guide and go to the part for Using Eclipses Android Development Tools (ADT) Ant Based Build
2. Download a python script getMavenArtifactsNG.py  This is in Python 3. Hopefully you have that!
3. Create an artifacts.csv file with the text information given in the paragraph
4. Execute the command ./getMavenArtifactsNG.py -f artifacts.csv -p <path_to_Eclipse_Workspace_Directory>/ChatIOT which is the project directory. This will populate the libs and libs-sources directory with a zooful of jar files!

Refresh the project and this will remove all errors EXCEPT on the lines that refer to the ChatManager. For some reason, the script given above does not load the smack-IM libraries!

5. Go to the downloads section of the Smack library and download the smack-4.1.4.zip file. Unzip this file, locate ONE file smack-im-4.1.4.jar and copy it into ChatIOT/libs directory.

This should remove all compile time errors.

Finally, open the AndroidManifest.xml file located in the ChatIOT project folder and insert one line on permission to access the Internet :
AndroidManifest.xml

<?xml version="1.0" encoding="utf-8"?>
<manifest xmlns:android="http://schemas.android.com/apk/res/android"
    package="com.yantrajaal.chatiot"
    android:versionCode="1"
    android:versionName="1.0" >

    <uses-sdk
        android:minSdkVersion="19"
        android:targetSdkVersion="19" />

    <uses-permission android:name="android.permission.INTERNET" />
    
    <application
        android:allowBackup="true"
        android:icon="@drawable/ic_launcher"
        android:label="@string/app_name"
        android:theme="@style/AppTheme" >
        <activity
            android:name=".MainActivity"
            android:label="@string/app_name" >
            <intent-filter>
                <action android:name="android.intent.action.MAIN" />

                <category android:name="android.intent.category.LAUNCHER" />
            </intent-filter>
        </activity>
    </application>

</manifest>


Now if the MainActivity.java program is Run as an Android Application, it should show up on the Emulator like this :

To test the program we need to do the following tasks

  1. This test assumes that we have two registered userid at the xmpp server adastra.re.  So create two IDs say uid2 and uid3. In principle you can choose any public XMPP server but this program has been tested at AdAstra.
  2. Set up the ChatIOT listener chatbot by following these instructions and and start the chatbot using the uid3 userid and its corresponding password.
  3. Start the ChatIOT app either in the Emulator or in a physical Android device
  4. Press the Connect button -- this will connect to the AdAstra server and login as uid2
  5. Press the Send button -- this will first send a message to the listener that contains the text "SOUND 2". This will cause an alarm sound. Next it will send three messages consisting of the word PUSH followed by a random number. These three random numbers would be stored in the SQLite database on the listener machine. There will be a 5 second gap between the messages
  6. The Send button can be pressed repeatedly.
  7. The Disconnect button will cause a logout.
  8. Finally for uid2 to be able to send a message to uid3, the two users must be in each others contact lists! Please use a standard IM client like Pidgin or Xabber to first establish this contact. Otherwise no message will ever be relayed.
  9. You may be wondering why we have used uid2, uid3 as users. Actually there is another user uid1 through which we can keep a check on when uid2 and uid3 are logged in and able to communicate.
In this program we are simply transmitting numbers generated at random. In a real IOT case, these numbers will be generated by physical sensors connected to the Android device. [ this is explained in a subsequent post, where we see how to sense and report illumination levels ]

Java programming on Eclipse is a treacherous business because more often than not the libraries cannot be located and loaded. With Android and Smack there is another level of complexity. Hopefully the steps given here will work. If there is a problem, you can always download the entire project from GitHub, with all libraries in place, and import the same into Eclipse.


15 Sept 2015

DIY IOT : XMPP Chatbot in Python

A key challenge in building the "Internet of Things" is to be able to connect a device to a computer over the internet and to use as simple and lightweight an infrastructure as possible. In this post we demonstrate how a public XMPP chat server can be used to transmit data and commands from one device to another using a chat client at one end and a python "bot" sitting on the other end. We will demonstrate the ability to INSERT data into an SQLite database, SELECT records from the same, play a variety of .wav files and execute any system commands on a "central" machine from any distant machine that supports an XMPP chat client.


Before starting on this exercise, we searched the web for prior activity in this area and we came across this webpage that suggests a similar approach for controlling devices over the internet, but the strategy explained here is simpler to code and implement.

We looked for a list of public XMPP chat servers and selected the Ad Astra service, perhaps because it was the first on the list! We next registered two userids, say x1@adastra.re and x2@adastra.re to be used on the two different machines using the web-registration form, because the in-band registration does not work!

We next installed the Pidgin chat client on two different Ubuntu machines and verified that text messages where being sent and received through the Ad Astra server without any problem.

Since working with two machines on a desktop is difficult, we configured our experimental setup as one Android phone acting as the distant machine and an Ubuntu 14.04 laptop acting as the central server. Commands transmitted from the Android phone using the Xabber chat app would be received on the server and acted upon.

For the server side we configured a chatting robot, or chatbot with Python using the xmppy library and using the code for the sample bot as a starting point. The sample bot program has a number of sample "handlers" that perform some simple tasks. These were modified to perform the following tasks
  • PUSH - to insert a piece of data into an SQLite database
  • PULL - to select a record from the SQLite database
  • SOUND - to play a selection of .wav files using the aplay command available in Ubuntu
These tasks were to be executed by calling a shell program and passing the relevant parameters through the python subprocess command.

There were three other handlers
  • EXESYS - to execute any system command on the central machine
  • TEST - to echo the command received back to the sender as a debugging measure
  • HELP - that lists all the possible commands.
Before the chatbot starts, we need to install SQLite, create a database and within it, an rdbms table. 

The chatbot ("chatIOT") is a python script that needs to be started with the userid@servername.com and the password as the parameters. It then listens for text messages and responds as appropriate to the six commands listed above.


The Xabber chat client on the Android phone is now used to send messages as follows


In the left hand image of a screenshot of the Xabber client on the Android phone, we see that the value PULLed from the database is 100.4. Then we PUSH 51.29 into the database and the subsequent PULL shows two values namely 100.4, 51.29 that were stored in the persistent database.

The second, right hand image, shows how the unix command ls for directory listing is executed and the data is returned. We note the three .wav files that could be played by sending the SOUND command along with a number that indicates which file is to be played.

How realistic is this setup in simulating a real IOT scenario ?

All that the distant device needs is a chat client. If it is an Arduino board then it is possible to create a chat client for the same as explained here and elsewhere. If the Arduino is connected to Raspberry Pi2, then life is even simpler because with python it is very easy to create a simple chat client - xmit.py

If one is not comfortable with messages being transmitted through a public chat server then one can build one's one chat server using the free and opensource OpenFire software and host it on a secure but publicly visible IP address. But even otherwise the usage of standard userid, password mechanism of a public chat server offers decent security.

What we have demonstrated in this exercise is how to build a secure data transport mechanism using publicly available components and with minimal programming. IOT developers and enthusiasts can focus on the behaviour of the edge devices without having to worry about the "plumbing" that will move the data from one machine to another.


The following files are available at Github :
  • the main python "bot" script, chatIOT.py and the shell script kmd.sh that is called by chatIOT.py to execute the SQLite and sound commands.
  • createIOTdata.sh and viewIOTdata.sh to create the SQLite tables and view the data
  • three .wav files for the three sounds
  • xmit.py - a lightweight xmpp chat client for sending text messages

9 Sept 2015

DIY IOT : Collecting Remote Data over the Internet

One of the primary requirements for IOT - the "Internet of Things" is to collect data from remote devices over a TCP/IP internet connection and use the same for  analysis. Since the number of devices is expected to be very large -- far larger than the the number of IPv4 IP addresses that are possible, it is expected that IPv6 addressing will be used. However the sluggish rollout of IPv6 enabled network devices has necessitated the usage of intermediate "broker" services that allow the collection of data from devices and then publish the same for subsequent analytics.


This post will describe the architecture of such a system and provide sample codes that can be used to get a basic IOT Sensor Data collection.

Since the data will be travelling over the internet, the edge device must be a TCP/IP enabled computing device to which the sensor is connected. The simplest possible computer would be a Raspberry Pi2 or Arduino Yún  or similar machine, running on some lightweight flavour Unix or Linux. So in this case the sensor will be simulated by a small shell program that, in this case, emits two pieces of data (a) a sensor ID and (b) a numeric value, of temperature or pressure or voltage, that has been recorded by the sensor. With a real sensor device, this program will collect, or read it, from the sensor through a device driver program.

Once the data is available to a shell program ( we will call it ISD_pushData.sh ) it must be pushed into a central server and the easiest way to do it is using the curl command that is available in any Unix distribution. Where does one find such servers?

Companies like Carriots and GroveStream offer services that allows one to define a "device" that uses curl to send data in JSON or XML format to a datastream where it is stored for subsequent analysis. Carriots in fact offers a free service in which one can connect up to ten devices from which to collect, store and display data. Simple tutorials are available through which one can learn "How to send a stream using curl" and "How to create triggers" that will initiate actions based on the value of data that is received.

After working through these tutorials it becomes very evident that a similar service can be created on a Apache/MySQL/PhP platform that is widely available from any webhosting service like x10hosting or hostinger. The free versions are good enough for our purpose. This post in tweaking4all shows how this can be done and is forms the basis of this post.

What we need is (a) MySQL table to store the data (b) a shell program that will send data using curl to a destination URL on the web server and (c) a PhP program, available at the destination URL, that will accept data passed as parameters and insert it into the MySQL table.

The SQL command to create the MySQL table looks like this : ( Create_IOT_SensorData.sql)

CREATE TABLE `IOT_SensorData` (
`id` INT NOT NULL AUTO_INCREMENT PRIMARY KEY COMMENT 'unique ID',
`event` TIMESTAMP NOT NULL DEFAULT CURRENT_TIMESTAMP COMMENT 'Event Date and Time',
`sensorID` VARCHAR(30 ) NOT NULL COMMENT 'Unique ID of the sensor',
`Value` NUMERIC( 4,1 ) NOT NULL COMMENT 'Value of data recorded'
);


This PhP program (ISD_pushData.php) that sits on the web server and accepts the data

<?php
    // Connect to MySQL
    include("dbConnect.php");

    $con = mysql_connect($MyHostname, $MyUsername, $MyPassword) or die(mysql_error());
    if (!$con)
     {
       die("Could not connect: 1" . mysql_error());
     }
     mysql_select_db($MyDBname) or die(mysql_error());

    // Prepare the SQL statement
    $SQL = "INSERT INTO IOT_SensorData (sensorID ,Value) VALUES ('".$_GET["sensorID"]."', '".$_GET["Value"]."')";  
    
    // Execute SQL statement
    mysql_query($SQL,$con);
    
    // Send Mail
    $mailMSG = $SQL;
    $mailDEST = "someone@somewhere.com";
    if ($_GET["Value"] > 50){
      $mailSUB = "Warning : Value HIGH";
      } else {
      $mailSUB = "Value Normal";
      }
    mail($mailDEST,$mailSUB,$mailMSG);

?>


The PhP program  on the web server accepts the data from the following shell (ISD_pushData.sh) program, running on the remote Linux machine. Instead of reading a value from the sensor, the program is generating a random number and sending it.

p1="http://prithwis.x10.bz/IOT/ISD_pushData.php?sensorID="
sensorID="1003B"
p2="&Value="
Value=$(shuf -i 1-80 -n 1)   # random number being generated for Value
URL=$p1$sensorID$p2$Value
echo $URL
# -------------------------------------------------------
curl $URL


In fact, the PhP push program on the server is not only inserting the data into the MySQL table but is also acting as a trigger by sending two different types of mail depending on the value of the data that is received from the remote sensor.

Once the data is available in the MySQL table, it can be displayed (using ISD_viewData.php) as

In fact, one can run the shell script on any machine and the new value will appear when this pages is refreshed!

It is also possible to visualize the data graphically (using ISD_graphData.php)

All the codes used in creating this post are available on Github. The graph has been created with free tools available from JpGraph and the specific graph shown here is based on the sample shown here.

In this post we have demonstrated how data lying on remote Linux machine ( that is possibly connected to a physical sensor ) can be pushed into webserver and subsequently used for data analytics.