In an earlier post we had shown how a generic XMPP chat client (Xabber), running on an Android machine could be used as an IOT component to transmit data and commands, through a publicly hosted XMPP chat server, that can be stored or executed on a distant machine that hosts a python chatbot listener program.
However for any meaningful IOT task to be performed, we need a custom built XMPP chat client that will pick up up data from sensors and transmit it to the listener program. This would be a rather minimal XMPP client, without the bells and whistles required for a full fledged interactive chat client. All that it needs to do is to connect to a XMPP server, login with its userid/password credentials and transmit a IM message to the chatbot listener. Such a program for the Android program needs to be written in Java but BEFORE you begin typing "public static void main(string args) ...etc" you need to get your machine ready for Android programming ...
and believe me, that is not for the faint hearted!
However, don't panic! do not lose heart. I did it and so can you!
There are many tools that will help you build Android apps very quickly using a browser based GUI with drag and drop tools. One such is the AppInventor from MIT for which a decent tutorial is available in the StudyTonight website. Using this, you can build nice, quirky apps that will amuse your friends and give you bragging rights for being an Android developer. But these are just for toys. If you want do serious stuff, you need to go through what we are about to describe in this post.
First question, would you want to work in Windows or Linux ?
Most hardcore application developers, particularly the geeky nerds, prefer working with Linux. My machine has dual boot configuration with one Windows 7 partition and one Ubuntu 14.04 partition and I do most of my development in Ubuntu. However from Windows 8 onwards, dual boot is very difficult if not impossible. So the only option would be download the Oracle VirtualBox software into your Windows machine and install a free Ubuntu image by following instructions given on this page.
All this assumes that you want to develop on Linux. If you prefer the Windows platform then this post may not be relevant for you, except for pure academic interest.
The next decision is about which IDE ( Integrated Development Environment ) to use. Google offers the Android Studio that you can download and then you can Build Your First App by following the instructions. I went down this path and built my first HelloWorld program but realized that most people prefer the Eclipse option and so most of the samples and examples are based on Eclipse. Hence I also abandoned the Android Studio and joined the Eclipse bandwagon. Going forward, we shall stick to the Eclipse option.
I had already installed Eclipse v 3.8 on my Ubuntu partition for an earlier Hadoop project and so it was already there on my machine. However you may read about How to Install Latest Eclipse on Ubuntu by searching for the same on Google. Once Eclipse is installed it may be a good idea to write and run a Hello World program in Java/Eclipse. Just to make sure that things are good to go.
Now for the real stuff -- Java for Android on Eclipse!
First make sure that your development environment is adequate, and then set up the Android SDK. There are four tasks here, namely (a) Download the SDK, (b) Install Eclipse -- not necessary if you already have Eclipse, (c) Setup the Android Development Tool Plug In and (d) Create an Android Virtual device for you to test your Android Apps -- all of which are explained in the link given above. This download takes a while, read every screen carefully and generally go with the defaults.
Now you may go over and create your first hello world Android application. Do not forget to check out the various other excellent tutorials on the left side-bar.
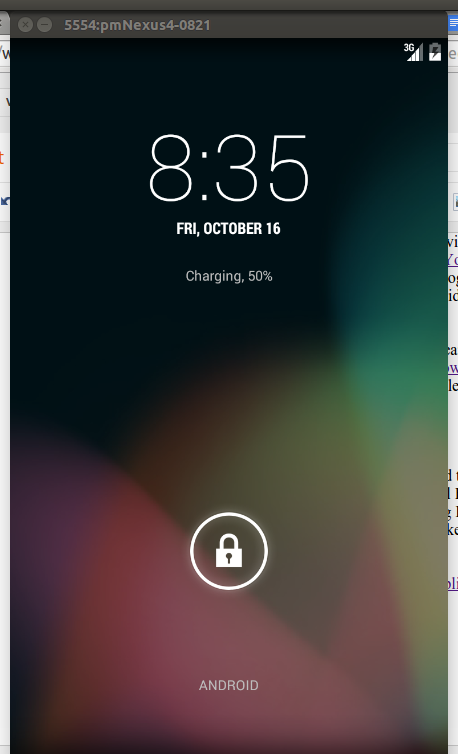
If everything goes well, you will see the Android Virtual Device being launched. It will look like any Android phone and you can click on the usual Android buttons and even browse the web or take pictures with it -- if you have configured it correctly. For the Hello World program, the sequence of screens will look like this.
Our application name is HelloWorld0851 ( located in the third row, right side) and when clicked it shows a little fragment of text "Namaskar 0851 Emulator".
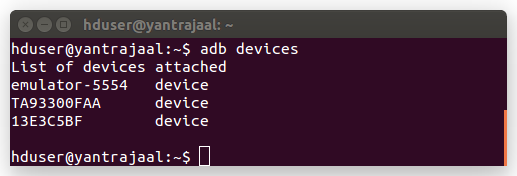
If at this point, you go to the Linux terminal and run the command the Android Device Bridge (adb) command >adb devices.
We will see only one Android Devices Connected to the machine -- this is the Emulator

Now we need to move from the Simulator to some real Android devices and I connect my Motorola Phone and Micromax Xiaomi tablet to the USB ports of the laptop. When connected, these devices show up on the adb command as follows:

The TA is the Motorola device and the 13E is the Micromax device. Now when you execute the HelloWorld program, you will be prompted to choose the device where it will be installed and run.
So are we done ? Well, I wish I could say so ... but NO, it is not very easy for the external devices to get connected to the Eclipse development environment.
So how do you connect an Android device to the Eclipse Development Environment ?
Step 1 : USB debugging mode.
When an Android device is connected to the USB port of a computer it is usually in the "media mode" that means that you can only transfer files (including .APK ). For serious work, the machine needs to be put in USB debug mode. Usually, the USB debug mode is hidden from lay users and has be discovered and activated and the process is different for each version of Android.
For the Motorola phone running Android 5.1 you need to go to :
Settings > About Phone > Build Number and press it 7 times.
For the Micromax Tablet running Android 4.4.4 you need to go to
Settings > About Pad > MIUI version and press 7 times
This is "Khulja Sim Sim" to the Alladin's cave of Android development and a new option called Developer Options will appear on Settings menu and within this there will be another option called USB debug mode. Both Developer Options and USB debug mode needs to be activated. When you do this for the first time, there may be a security warning and you need to accept the warning and allow the process to move forward. Denying the request will put your device in the limbo as far as application development is concerned.
For the specific device that you are using, you will have to Google for the steps involved or arrive their by trial and error!
In many cases, this is adequate. One needs to stop, restart the adb service by simply
>sudo adb kill-server
>sudo adb start-server
and hopefully the device will be detected.
But very often than not, this is not enough. Even after activating USB debug mode, the device may not be recognized. So now
Step 2 : Android-Rules
You need to create a file called 51-android-rules in the /etc/udev/rules.d directory as described in this post How to fix ADB no permissions, and explained in context in Stackoverflow. This will solve the problem for most common Android vendors, including Motorola, but unfortunately that does not include Micromax!
To identify the ID of the USB connected Micromax device, we executed the lsusb command :

This shows the ID of the various devices connected to the USB ports, most of which are recognizable from the descriptions.
For example ID 22b8-2382 is the Motorola Device and it is duly visible in the original file that we downloaded. So the there is a good chance that the unknown device with ID 271-066B must be the Micromax device. So we append on extra dummy line at the bottom of the 51-android-rules file with one extra line
SUBSYSTEM=="usb", ATTRS{idVendor}=="2717", MODE="0666"
and that does the trick! After creating the file with the extra line and executing the commands given in the two posts, both the Android devices are clearly visible with the adb command and are available for testing the application.
Update : My new Micromax Android One running Android 6 was recognised by the Android SDK without any problem. Just set it in USB debugging mode and you are done!
Now we are finally ready!
Go back to Eclipse and run the "MainActivity" java file of the HelloWorld program. There will be a prompt to choose the device which could be any one of the three devices, the emulator, the Motorola phone or the Micromax tablet. Once a physical device is chosen, the application will be installed on the device, started and will also be available like any other downloaded app.
The final hurdle to this happy state of affairs is Android Security does not allow apps to be installed from an unknown source, that is anything other than Google Play. This can be addressed by a simple configuration change that allows App Installs from Unknown Sources.
At the end of all this, we are finally ready to start building a real useful app for the XMPP client. That presents its own set of challenges with the Smack library that connects to the Ignite Openfire server. But that is another post for another day. Keep watching this space!
P.S. If you find this USB debug mode and the Android-Rules to be too much for you, you can always copy the APK file manually into the device while it is connected in the simple media-mode and install it by tapping the file twice in a file browser. See here.
However for any meaningful IOT task to be performed, we need a custom built XMPP chat client that will pick up up data from sensors and transmit it to the listener program. This would be a rather minimal XMPP client, without the bells and whistles required for a full fledged interactive chat client. All that it needs to do is to connect to a XMPP server, login with its userid/password credentials and transmit a IM message to the chatbot listener. Such a program for the Android program needs to be written in Java but BEFORE you begin typing "public static void main(string args) ...etc" you need to get your machine ready for Android programming ...
and believe me, that is not for the faint hearted!
However, don't panic! do not lose heart. I did it and so can you!
There are many tools that will help you build Android apps very quickly using a browser based GUI with drag and drop tools. One such is the AppInventor from MIT for which a decent tutorial is available in the StudyTonight website. Using this, you can build nice, quirky apps that will amuse your friends and give you bragging rights for being an Android developer. But these are just for toys. If you want do serious stuff, you need to go through what we are about to describe in this post.
First question, would you want to work in Windows or Linux ?
Most hardcore application developers, particularly the geeky nerds, prefer working with Linux. My machine has dual boot configuration with one Windows 7 partition and one Ubuntu 14.04 partition and I do most of my development in Ubuntu. However from Windows 8 onwards, dual boot is very difficult if not impossible. So the only option would be download the Oracle VirtualBox software into your Windows machine and install a free Ubuntu image by following instructions given on this page.
All this assumes that you want to develop on Linux. If you prefer the Windows platform then this post may not be relevant for you, except for pure academic interest.
The next decision is about which IDE ( Integrated Development Environment ) to use. Google offers the Android Studio that you can download and then you can Build Your First App by following the instructions. I went down this path and built my first HelloWorld program but realized that most people prefer the Eclipse option and so most of the samples and examples are based on Eclipse. Hence I also abandoned the Android Studio and joined the Eclipse bandwagon. Going forward, we shall stick to the Eclipse option.
I had already installed Eclipse v 3.8 on my Ubuntu partition for an earlier Hadoop project and so it was already there on my machine. However you may read about How to Install Latest Eclipse on Ubuntu by searching for the same on Google. Once Eclipse is installed it may be a good idea to write and run a Hello World program in Java/Eclipse. Just to make sure that things are good to go.
Now for the real stuff -- Java for Android on Eclipse!
First make sure that your development environment is adequate, and then set up the Android SDK. There are four tasks here, namely (a) Download the SDK, (b) Install Eclipse -- not necessary if you already have Eclipse, (c) Setup the Android Development Tool Plug In and (d) Create an Android Virtual device for you to test your Android Apps -- all of which are explained in the link given above. This download takes a while, read every screen carefully and generally go with the defaults.
Now you may go over and create your first hello world Android application. Do not forget to check out the various other excellent tutorials on the left side-bar.
If everything goes well, you will see the Android Virtual Device being launched. It will look like any Android phone and you can click on the usual Android buttons and even browse the web or take pictures with it -- if you have configured it correctly. For the Hello World program, the sequence of screens will look like this.
 |
 |
 |
 |
Our application name is HelloWorld0851 ( located in the third row, right side) and when clicked it shows a little fragment of text "Namaskar 0851 Emulator".
If at this point, you go to the Linux terminal and run the command the Android Device Bridge (adb) command >adb devices.
We will see only one Android Devices Connected to the machine -- this is the Emulator

Now we need to move from the Simulator to some real Android devices and I connect my Motorola Phone and Micromax Xiaomi tablet to the USB ports of the laptop. When connected, these devices show up on the adb command as follows:
The TA is the Motorola device and the 13E is the Micromax device. Now when you execute the HelloWorld program, you will be prompted to choose the device where it will be installed and run.
So are we done ? Well, I wish I could say so ... but NO, it is not very easy for the external devices to get connected to the Eclipse development environment.
So how do you connect an Android device to the Eclipse Development Environment ?
Step 1 : USB debugging mode.
When an Android device is connected to the USB port of a computer it is usually in the "media mode" that means that you can only transfer files (including .APK ). For serious work, the machine needs to be put in USB debug mode. Usually, the USB debug mode is hidden from lay users and has be discovered and activated and the process is different for each version of Android.
For the Motorola phone running Android 5.1 you need to go to :
Settings > About Phone > Build Number and press it 7 times.
For the Micromax Tablet running Android 4.4.4 you need to go to
Settings > About Pad > MIUI version and press 7 times
This is "Khulja Sim Sim" to the Alladin's cave of Android development and a new option called Developer Options will appear on Settings menu and within this there will be another option called USB debug mode. Both Developer Options and USB debug mode needs to be activated. When you do this for the first time, there may be a security warning and you need to accept the warning and allow the process to move forward. Denying the request will put your device in the limbo as far as application development is concerned.
For the specific device that you are using, you will have to Google for the steps involved or arrive their by trial and error!
In many cases, this is adequate. One needs to stop, restart the adb service by simply
>sudo adb kill-server
>sudo adb start-server
and hopefully the device will be detected.
But very often than not, this is not enough. Even after activating USB debug mode, the device may not be recognized. So now
Step 2 : Android-Rules
You need to create a file called 51-android-rules in the /etc/udev/rules.d directory as described in this post How to fix ADB no permissions, and explained in context in Stackoverflow. This will solve the problem for most common Android vendors, including Motorola, but unfortunately that does not include Micromax!
To identify the ID of the USB connected Micromax device, we executed the lsusb command :

This shows the ID of the various devices connected to the USB ports, most of which are recognizable from the descriptions.
For example ID 22b8-2382 is the Motorola Device and it is duly visible in the original file that we downloaded. So the there is a good chance that the unknown device with ID 271-066B must be the Micromax device. So we append on extra dummy line at the bottom of the 51-android-rules file with one extra line
SUBSYSTEM=="usb", ATTRS{idVendor}=="2717", MODE="0666"
and that does the trick! After creating the file with the extra line and executing the commands given in the two posts, both the Android devices are clearly visible with the adb command and are available for testing the application.
Update : My new Micromax Android One running Android 6 was recognised by the Android SDK without any problem. Just set it in USB debugging mode and you are done!
Now we are finally ready!
Go back to Eclipse and run the "MainActivity" java file of the HelloWorld program. There will be a prompt to choose the device which could be any one of the three devices, the emulator, the Motorola phone or the Micromax tablet. Once a physical device is chosen, the application will be installed on the device, started and will also be available like any other downloaded app.
The final hurdle to this happy state of affairs is Android Security does not allow apps to be installed from an unknown source, that is anything other than Google Play. This can be addressed by a simple configuration change that allows App Installs from Unknown Sources.
At the end of all this, we are finally ready to start building a real useful app for the XMPP client. That presents its own set of challenges with the Smack library that connects to the Ignite Openfire server. But that is another post for another day. Keep watching this space!
P.S. If you find this USB debug mode and the Android-Rules to be too much for you, you can always copy the APK file manually into the device while it is connected in the simple media-mode and install it by tapping the file twice in a file browser. See here.
I have been reading out a lot of your articles and that i ought to say pretty nice stuff. I will certainly bookmark your internet website
ReplyDeleteDevops Online Training
Java is one of the popular programming language use to develop all kind of software. Java is the base for all current new technology. Without Knowing java is much difficult to survive in IT industry. Thank you for valuable information. Keep share more useful information. Learn Android Mobile App Development with Java.
DeleteAndroid App Development Training in Chennai
Android Course in Chennai
Your good knowledge and kindness in playing with all the pieces were
ReplyDeletevery useful. I don’t know what I would have done if I had not
encountered such a step like this.
Android Training in Chennai
Android Training in Bangalore
Thanks for sharing the wonderful information with us. You can have access to Android Tutorials for free.
DeleteAmazing Article, thank you!. I am very glad to read your informative & practical blog. Kindly keep updating your blog. Java Developer is a wonderful career for IT students.To start Dream Career to become a Java developer learn from Java Training in Chennai. or learn thru Java Online Training from India
Deleteits a good news.
ReplyDeletePSD To Cratejoy
Great Article
DeleteIEEE Final Year Projects for CSE
IEEE Project Centers in Chennai
Really informative blog post.Much thanks again. Much obliged.annoying add blocker
ReplyDeleteThanks for sharing the wonderful information with us. You can have access to Java Tutorials for free.
ReplyDeleteGreat tips and its so easy to understand. Really I feel happy to see this useful blog, Thanks for sharing such a nice blog. RPA Training Institute in Chennai | UI Path Training Institute in Chennai | Blue Prism Training Institute in Chennai
ReplyDeleteHi Thanks for the nice information its very useful to read your blog. We provide best Digital Transformation Overview :
ReplyDeleteServices
Hi, Thank you for sharing such nice blog about IOT. Please keep on up dating.
ReplyDeleteMassil Technologies proved No.1Mobile app development Services
I really enjoyed while reading your article, the information you have delivered in this post was damn good. Keep sharing your post with efficient news.
ReplyDeleteALM Training Institute in Chennai | ISTQB Training Institute in Chennai
Very good informative article. Thanks for sharing such nice article, keep on up dating such good articles.
ReplyDeleteNO.1 AQM Services | Application Quality Managment Services
Good information, thanks for sharing.
ReplyDeleteBest cloud computing Services | Austere Technologies
Nice blog. Thanks for sharing such a helpful information.
ReplyDeleteNO.1 CLOUD SERVICES | Oracle Cloud PAAS | MASSIL TECHNOLOGIES
Great information. Keep update.
ReplyDeleteBEST MOBILE APPLICATION DEVELOPMENT SERVICES | MASSIL TECHNOLOGIES
Almost all U.S. corporations have some form of restrictions or policy regarding tattoos on the job.tattoo supply
ReplyDeleteExcellent article about IoT, keep sharing.
ReplyDeleteBest IT Security Services | Austere Technologies
Excellent post! Thank you for Sharing.
ReplyDeleteApache Spark Training in Chennai
| Apache Spark Online Training
Wow...What an excellent informative blog, really helpful. Thank you.
ReplyDeleteBest Commerce College in hyderabad | Avinash college of commerce
Excellent information you made in this blog, very helpful information. Thanks for sharing.
ReplyDeleteSoftware Testing | Austere Technology
Thank you for sharing this valuable information. But get out this busy life and find some peace with a beautiful trip. book best Andaman honeymoon packages
ReplyDeleteExcellent informative blog, keep for sharing.
ReplyDeleteBest System Integration services | Massil Technologies
Excellent informative blog, Thanks for sharing.
ReplyDeletecs institutes in hyderabad | Avinash College of Commerce
Thank you so much for sharing this. keep sharing.
ReplyDeleteCFA training institute in Hyderabad | ISFS
I am happy to find this post very useful for me, as it contains lot of information. I always prefer to read the quality content and this thing I found in you post.
ReplyDeleterunkeeper
kajal agarwal hot
Great blog!!!! Thanks for spending time with us.
ReplyDeleteSEO Training in Chennai
JAVA Training in Chennai
Big Data Training in Chennai
Selenium Training in Chennai
German Classes in chennai
DOT NET Training in Chennai
French Classes in Chennai
French Classes in OMR
Have been a long wait for this blog. Happy on reading. Do share more of this kind.
ReplyDeleteSpoken English Classes in Velachery
Spoken English in Velachery
Spoken English Classes in Tambaram
Spoken English Class in Chrompet
Spoken English Classes in OMR Chennai
Spoken English Classes in Perungudi
Spoken English Class in Ambattur
Spoken English Class in Avadi
Great casino, ever casino win real money you can safely put the top ten, with the new year already playing. At first I didn’t enter the topic as it is not hung with all sorts of bells and whistles I used to, but over time you realize that only good gaming games, bonuses and timely payments are needed in the casino, everything else interferes and distracts.
ReplyDeleteThis was an excellent post. This blog was really comprehensive and helpful to me. Thanks for sharing.
ReplyDeleteGerman Classes in Mulund
German Language Classes in Mulund
German Classes in Mulund West
German Course in Mulund East
French Classes in Mulund
French Classes in Mulund East
French Classes in Mulund West
French Language Classes in Mulund
انا استخدم تطبيق سيرياتالك يعمل بنظام xmpp و ejabberd و ارغب في تصميم مودات ejabberd هل احد يستطيع مساعدتي
ReplyDeletehttp://www.syriatalk.im/
Excellent post and it is really useful for most of the freshers.
ReplyDeleteFrench Classes in Chennai
best french classes in chennai
Spoken English in Chennai
IoT courses in Chennai
spoken english course in chennai
Node JS Course in Chennai
IELTS Coaching in Chennai
Xamarin Course in Chennai
content writing course in chennai
spanish coaching in chennai
French Classes in OMR
French Classes in Porur
I found some useful information in your blog, it was awesome to read, thanks for sharing this great content to my vision, keep sharing..
ReplyDeleteBig Data Hadoop Training In Chennai | Big Data Hadoop Training In anna nagar | Big Data Hadoop Training In omr | Big Data Hadoop Training In porur | Big Data Hadoop Training In tambaram | Big Data Hadoop Training In velachery
ReplyDeleteThanks of sharing this post…Python is the fastest growing language that helps to get your dream job in a developing area. It says every fundamental in a programming, so if you want to become an expertise in python get some training
Dot Net Training in Chennai | Dot Net Training in anna nagar | Dot Net Training in omr | Dot Net Training in porur | Dot Net Training in tambaram | Dot Net Training in velachery
Excellent information you made in this blog, very helpful information. Thanks for sharing.
ReplyDeletejava training in chennai
java training in omr
aws training in chennai
aws training in omr
python training in chennai
python training in omr
selenium training in chennai
selenium training in omr
Great tips and its so easy to understand. Really I feel happy to see this useful blog, Thanks for sharing such a nice blog
ReplyDeleteweb designing training in chennai
web designing training in omr
digital marketing training in chennai
digital marketing training in omr
rpa training in chennai
rpa training in omr
tally training in chennai
tally training in omr
Wonderful blog with great piece of information. Regards to your effort. Keep sharing more such blogs.Looking forward to learn more from you.
ReplyDeleteangular js training in chennai
angular js training in tambaram
full stack training in chennai
full stack training in tambaram
php training in chennai
php training in tambaram
photoshop training in chennai
photoshop training in tambaram
Wow, amazing weblog format! How lengthy have you been running a blog for? you make running a blog look easy. The total glance of your website is wonderful, let alone the content!
ReplyDeleteoracle training in chennai
oracle training in velachery
oracle dba training in chennai
oracle dba training in velachery
ccna training in chennai
ccna training in velachery
seo training in chennai
seo training in velachery
Your good knowledge and kindness in playing with all the pieces were
ReplyDeletevery useful.keep it up!!
android training in chennai
android online training in chennai
android training in bangalore
android training in hyderabad
android Training in coimbatore
android training
android online training
Nice blog with excellent information. Thank you, keep sharing.
ReplyDeleteoracle training in chennai
oracle training in annanagar
oracle dba training in chennai
oracle dba training in annanagar
ccna training in chennai
ccna training in annanagar
seo training in chennai
seo training in annanagar
PSD to HTML Cloud is a premium wordpress agency providing premium services located in US.
ReplyDeleteHi Thanks for the nice information its very useful to read your blog. We provide bestsalesforce training in chennai
ReplyDeletesoftware testing training in chennai
robotic process automation rpa training in chennai
blockchain training in chennai
devops training in chennai
This comment has been removed by the author.
ReplyDeleteI am looking for some good blog sites for studying. I was searching over search engines and found your blog site. Well i like your high quality blog site design plus your posting abilities. Keep doing it.
ReplyDeleteJava Training in Chennai
Java Course in Chennai
Đặt mua vé masybay giá rẻ tại Aivivu, tham khảo
ReplyDeletegiá vé máy bay đi Mỹ khứ hồi
chuyến bay về việt nam từ mỹ
giá vé máy bay từ anh về việt nam
vé máy bay từ pháp về việt nam giá rẻ
I really happy found this website eventually. Really informative and inoperative, Thanks for the post and effort! Please keep sharing more such blog.
ReplyDeleteDevOps Training Institute in Pune
Dayananda Sagar Academy of Technology and Management (TC) is approved by All India Council for Technical Education (AICTE), Govt. of India and affiliated to Visvesvaraya Technological University.
ReplyDeleteVisit: Direct Admission in Dayananda Sagar College of Engineering.
Langger is one of the best brands when it comes to gun safes.
ReplyDeleteVisit: Best Langger Gun Safes in US.
Choosing the ideal washing machine for you can be an intimidating task. Even if you try to select a washing machine with the best features, it can be quite heavy on your pockets.
ReplyDeleteVisit: Best Washing Machine under Rs 10000
Best Mixer Grinder in India
ReplyDeleteA mixer grinder is a cooking device that is most commonly used in today’s modern kitchen. It is generally an electric appliance.
Visit: Best Mixer Grinder in India.
SEO Specialist India
ReplyDeleteSEO(search engine optimization) is good for the social promotion of your web site.
Visit: SEO Specialist India