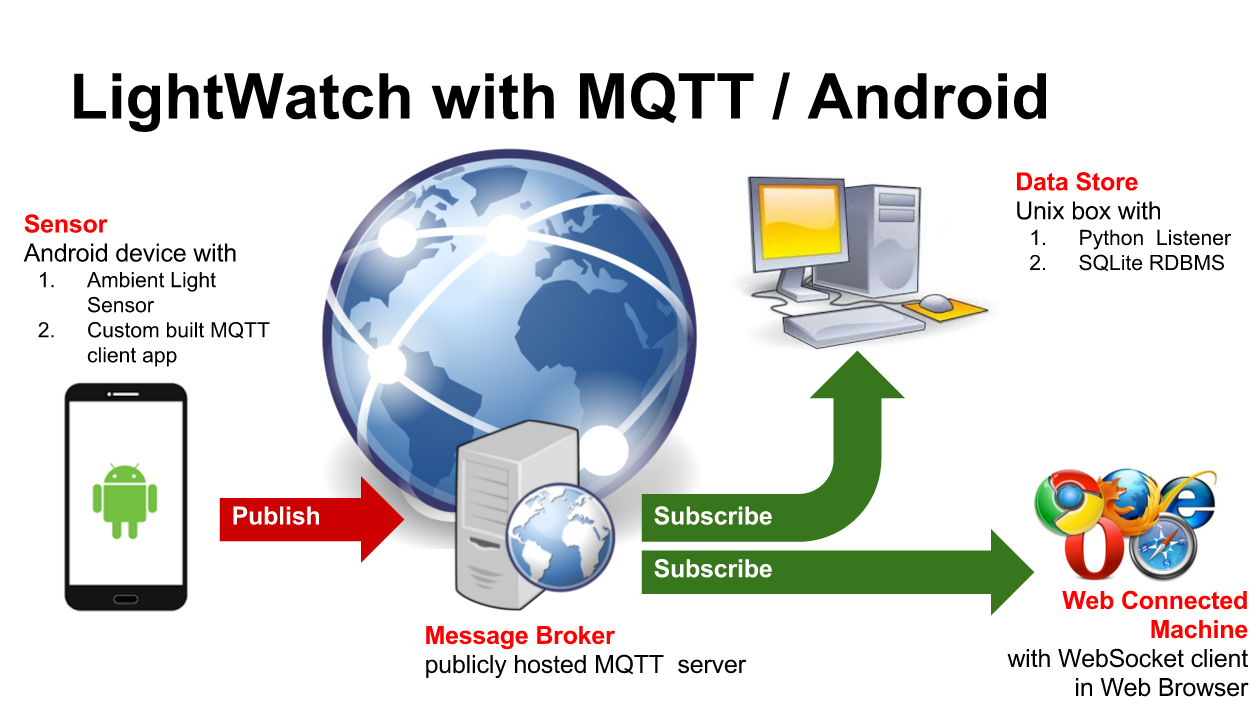
In two earlier posts, we had explored how to create (a) LightWatch - an IOT proof-of-concept for an ambient light sensor based on Android and the XMPP chat protocol and (b) LightWatchMQ - which would essentially do the same thing but use the more popular MQTT protocol. In each case we were essentially trying to simulate an IOT system based on the Android platform that will use native (or external ) sensors attached to the Android device to communicate with a central "controller" machine. This machine could be a simple Android device with the XMPP or MQTT client or could be running a Python program that listens for messages, extracts data and stores the same in a SQL database.
In this application, we, in a sense close the loop! Not only does the Android device transmit data from its sensors but in term it can be controlled to perform a physical activity -- sound a bell or flash its LED light when "instructed" to do so by the central machine.

Another very interesting feature of this app is that each device on which this app is run, automatically gets its own id derived from the Android ID . This is Published. So messages Published by the central server can contain this Android ID and the app can be modified to parse subscribed message so that each machine ONLY responds to messages that contains its own Android ID. So in effect, the broadcast can be converted into a narrow-cast and target only specific machines.


In this application, we, in a sense close the loop! Not only does the Android device transmit data from its sensors but in term it can be controlled to perform a physical activity -- sound a bell or flash its LED light when "instructed" to do so by the central machine.

The sequence of events is as follows :
- A custom built app IOT7939 is started on the remote Android device. This measures the ambient light near the device and publishes two messages on the IOT79 topic of a publicly hosted MQTT webserver, eg http:/broker.hivemq.com:1883 or http://test.mosquitto.org:1883
- A central MQTT client subscribes to this topic, IOT79, using, for example a websockets client available at http://www.hivemq.com/demos/websocket-client/ or http://test.mosquitto.org/ws.html Both these clients can Publish or Subscribe to their respective brokers. However any third party MQTT client can also be used. Hence data from the Android machine is received here.
- If the central MQTT client wants to initiate an activity on the Android device, it publishes a message on the IOT39 topic. The remote Android machine has subscribed to this topic and listens for a message. When the message arrives, three things happen :
- Another publishing activity is triggered on the Android App, as a kind of acknowledgment for the message received and also to transfer fresh sensor data.
- A bell mp3 file is played. If the message contains the world "siren" a different alarm mp3 file is played.
- The LED flash on the Android is activated for 5 seconds.
While the Publish and Subscribe activities are reasonable easy to build into the app, the flashing light constitutes a challenge. While there are many webposts that explain how to operate the flash on an Android device and even give the sample code, almost all of them are based on the deprecated camera class of Android and samples with the new camera2 class are not easily available. What this means is that code that runs on one machine may not run on another. For example, the Flashlight code that was used in this application runs happily on my Motorola with Android 5.1 but did not run on my Micromax with Android 6!
Rather than breaking our head on this, what we did was to de-couple the LED-flashing code from the general MQTT Pub/Sub code and created two apps. The LED Flashlight app is a very simple app that "OnStart" switches on the LED, waits for 5 second, switches the LED off and then exits. This app can easily be replaced with any more rugged Flashlight app that has an inbuilt feature to turn-on itself during the start. This LED flashlight app can be called from the main App with a few lines of code, provided we know the package and the activity name.
    String ExternalAppPackage = "org.iothub.flashlight";
    String ExternalAppActivity = "org.iothub.flashlight.MainActivity";

    Intent intent = new Intent(Intent.ACTION_MAIN);
    intent.setComponent(new ComponentName(ExternalAppPackage,ExternalAppActivity));
    intent.addFlags(Intent.FLAG_ACTIVITY_NEW_TASK);
    startActivity(intent);
Another very interesting feature of this app is that each device on which this app is run, automatically gets its own id derived from the Android ID . This is Published. So messages Published by the central server can contain this Android ID and the app can be modified to parse subscribed message so that each machine ONLY responds to messages that contains its own Android ID. So in effect, the broadcast can be converted into a narrow-cast and target only specific machines.

This screen-shot shows the WebSockets client on the central machine that receives message on IOT79 topic and these messages contain the Android ID as the first field. Also note that when it Publishes on the IOT39 topic, the message is trapped on the Android app and published "back". Since the message can be trapped, it can be parsed and acted upon "intelligently" with a simple if-then-else construct.
In fact, any third party MQTT client can be used to subscribe to and publish messages on the IOT79, IOT39 topics as shown in this screen capture here

The entire code for the main MQTT Pub/Sub app IOT7939 and the auxiliary Flashlight app is available in GitHub code repository.
Android is one of the most widely used platforms in the world and it is very likely that The Smartphone and the Internet of Things will get very closely tied to each in the future. Hence it makes sense to learn and explore how the key features of IOT can be implemented with Android. This was the motivation for building this proof-of-concept.